How to Mine Crypto Directly to a Ledger Nano
The question is “Can I mine directly to Ledger Nano?” Technically you can’t as it would take thousands of verifications for every bit of crypto you mine, however, going through a pool and limiting payouts to a threshold is a way you can mine directly to a Ledger Nano S or X.
Altcoin mining is a method of using a devices graphics card (GPU) to earn altcoins as reward for validating blockchain transactions. To make this profitable you will normally require a high end gaming graphics card that’s not an LHR (Limited Hash Rate) version. Since the mining boom, Nvidia have put a limit on most new 30 series graphics cards which limits the hash rate (LHR) required for crypto mining. To be safe, try to purchase an RTX 2060 Super which can achieve a hashrate of up to 45MH/s with a little fine tuning. You can also stick to AMD cards knowing that AMD GPUs don’t limit the hashrate, the best AMD would be the RX 6800, more expensive than the 2060 Super but around 60MH/s of power using half the wattage of the RX 6900. You could also purchase the new RX 6600XT which, although has a low hashrate of 30MH/s, only uses 50Watts of power and this GPU is currently cheaper than the 2060 Super. If you wish to experiment first, follow the guide below and you can mine from an external cloud server with a little bit of free credit.
How to Start Mining from a Cloud GPU Server for Free
If you don’t want to dive in and invest lots of money buying a graphics card, you can try cloud mining for free. This simple guide will show you how to mine using an external GPU server with $50 free credit! You will learn how to setup an Ubuntu instance running Gminer to mine some XRP (Ripple) directly to your Ledger Nano. We have chosen XRP as the withdrawal cost is free and the withdrawal limit is set to 1 XRP coin, which is just over $1 USD as of writing this guide. So you will learn how to mine from the cloud and get some free XRP into your Ledger Nano.
What you will need to start:
- A Ledger Nano setup with your XRP withdrawal address. If you haven’t already purchased and setup your Ledger Nano, visit the Ledger website here. The lower priced Nano S is perfectly fine. Setup your Ledger Nano, create an XRP account and copy your XRP withdrawal address which we will be needed to send your mined coins over to.
- A Prohashing account. Prohashing is a mining pool. A mining pool is many devices connected together, mining the same algorithm and all earnings are divided out fairly amongst all miners connected to the pool. You need to use a pool otherwise you could be waiting literally years to solve a single transaction unless you have 100s of powerful graphics cards able to compete with mining farms. Prohashing also allows you to mine over 120 different altcoins.
- A Genesis Cloud account. Genesis Cloud offers GPU servers at affordable prices. You will use our referral link that will enable you to get $50 free when you create your first instance.
Use the buttons below to visit each website required to start mining.

If you haven’t already purchased a Ledger Nano, either a Nano S or Nano X is what you should be looking for. A Nano S is the cheaper of the two, however, it works perfectly fine with this mining guide.
Please note that we are affiliates of eBay and using the “Browse Nano Deals” button above will take you to eBay using our affiliate ID. We will earn commission on anything you purchase from eBay when you visit eBay through our linked button.

Let’s Start Mining to our Ledger Nano!
Now that you have your Ledger Nano setup with your XRP (Ripple) withdrawal address, a Prohashing and Genesis Cloud account, we can start mining.
1, Setting up your Prohashing account.
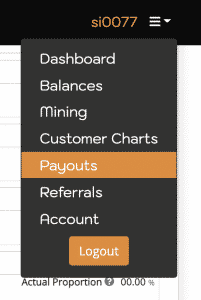
The first thing we need to do is setup your Prohashing account so you are mining for 100% XRP. Make sure you are logged into your Prohashing account and visit the “Payouts” page from the top right menu.
Now click or tap “+ Add New Payout Option”.

A screen will load up showing all the payout options available to you. You can choose any you like but for this guide we will use XRP due to the low payout threshold. Scroll down, find and click the Ripple box.

Now add your withdrawal address you got from your Ledger Nano, (use 12345678 as the destination tag) it should look something like this below:
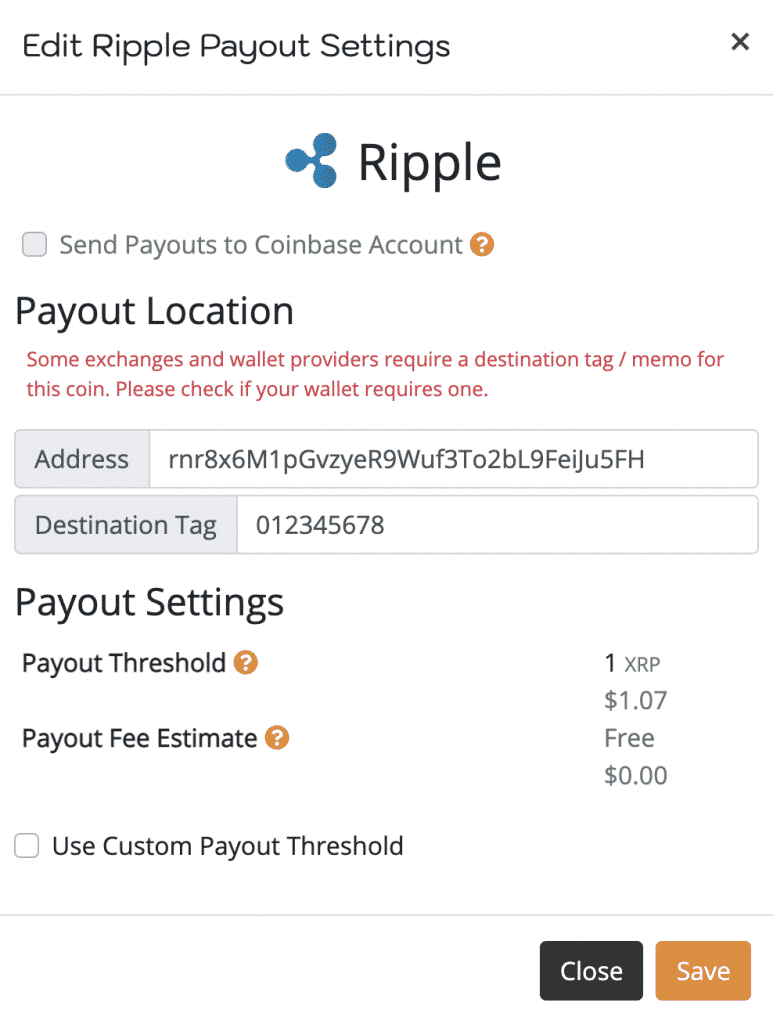
Now click the box next to “Use Custom Payout Threshold and set it to the minimal and “Save“.
Now set the Target Proportion to 100% and click “Save Proportions” at the top of the page.

Your Prohashing account is ready!
2, Setting up a GPU mining server with Genesis Cloud.
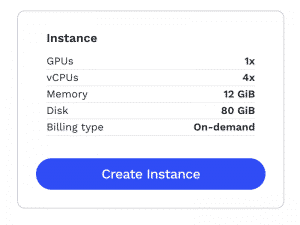
Login to your Genesis Cloud account and at the very top you will see the button “Create New Instance”, click it.

On the next page, leave the Hostname and Nickname as they are.
Select Instance type = GPU Nvidia
The best GPU you can use for ROI is the GeForce™ RTX 3080 check that box.
Leave the rest of the configuration as it is.
Important: Make sure you enable “Install NVIDIA GPU driver 460.80”.
Select Image should be “Ubuntu 20.04”, this should be set as default.
Authentication needs to be set as “Password”.
Make sure you copy the generated password and store it somewhere in a notepad file, you will need this to login to your created server.
On the bottom right, click “Create Instance”.
Your GPU server is now being created and should take no longer than 10 minutes to go live.
When ready, you will see “Active” in green:
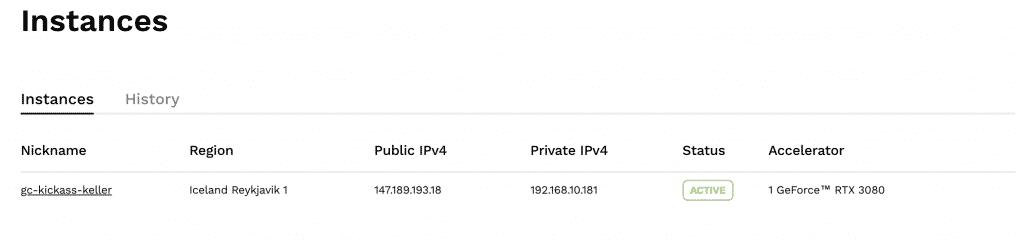
Click on the Nickname and you will find your server IP and SSH credentials needed to login to the server.
Scroll down to SSH Command and copy the ssh ubuntu@IP address. The IP address should be 4 sets of numbers separated by a full stop, for example, 147.189.193.18. So you would have something like ssh ubuntu@147.189.193.18. Save it to your notepad file.
When your server is ready, we need to login to it and install the mining software to mine your crypto coins.
Before we install the mining software, we need to create your mining URL. Simply replace PROHASHING-USERNAME with your Prohashing username in the command below and save it to your notepad file:
cd gminer && ./miner --algo ethash --server prohashing.com --port 3339 --user PROHASHING-USERNAME --pass x
Next, if you are using Windows, load up CMD, if you are using Mac, load up Terminal.
Enter the following commands one by one.
- ssh ubuntu@your-server-IP (Replace your-server-IP with the IP of your server you created with Genesis Cloud)
- At the password prompt, enter the password you copied from Genesis Cloud when you created the server.
- sudo add-apt-repository ppa:ethereum/ethereum
- sudo apt update
- sudo apt install ethereum
- mkdir gminer
- wget -O gminer/gminer.tar.xz https://github.com/develsoftware/GMinerRelease/releases/download/2.54/gminer_2_54_linux64.tar.xz
- tar xf gminer/gminer.tar.xz -C gminer/
- crontab -e
- You will see the following: select “/bin/nano <—- easiest” type 1 and press enter. Scroll down to the bottom of the file and enter the command in the next step.
@reboot cd gminer && ./miner --algo ethash --server prohashing.com --port 3339 --user PROHASHING-USERNAME --pass x- Make sure you replaced PROHASHING-USERNAME with your actual Prohashing username. Press control and X on your keyboard to save and exit.
- sudo reboot
The server will now reboot and run the command to start mining. Go back to your Prohashing account and visit the mining page here it might take 5 to 10 minutes for the miner to show.
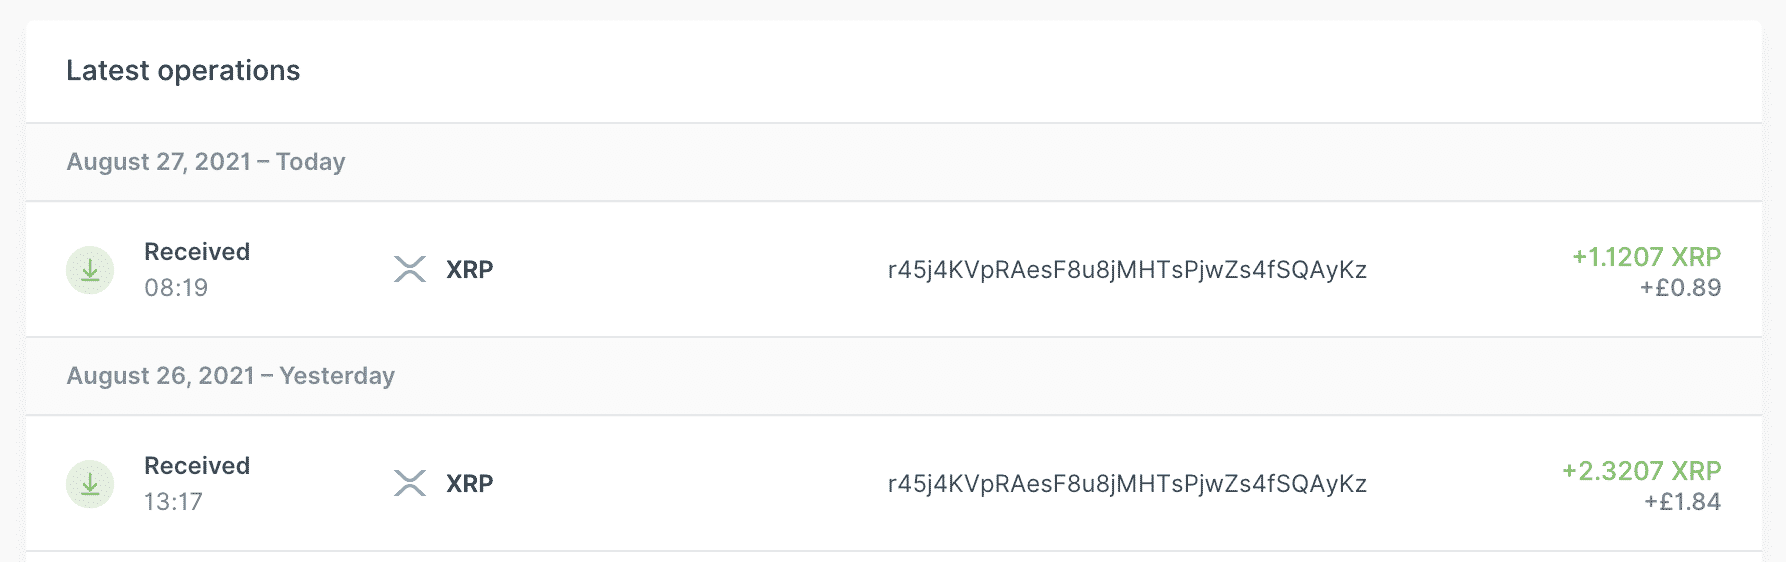
The miner will continue to mine 24/7 for as long as you like. Prohashing will send XRP to your Ledger Nano automatically on a daily basis, normally around 6am GMT.
Open your Ledger app and every day you should see XRP being credited to your account, example below: